
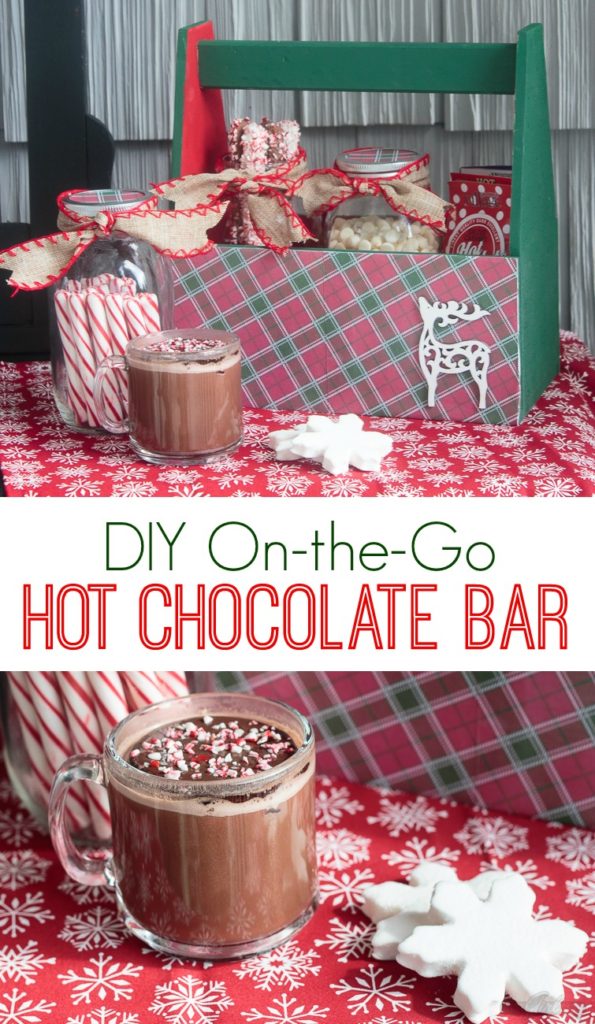
Take the party on the road with this portable caddy, filled with everything you need to set up a hot chocolate bar. Just add hot water!
With the arrival of winter and chillier days and nights, the requests for hot chocolate are amping up.

This mama is ready!
Disclosure: This is a sponsored post, and it may include affiliate links. If you make a purchase based on my referral, I earn a small commission, at no additional cost to you. Read my full disclosure policy here.
In partnership with DecoArt, I created this portable hot chocolate bar filled with lots of fun cocoa mixes, fixings and toppings. Just add hot water or milk!

You just need a wooden tool caddy, mason jars and few simple craft supplies to make your own.
[clickToTweet tweet=”Hot chocolate on the go? Learn how to transform a tool caddy into an adorable hot chocolate bar ” quote=”Hot chocolate on the go? Learn how to transform a tool caddy into an adorable hot chocolate bar “]
Supplies

- Wooden tool caddy
- Scrapbook paper
- Mason jars
- Wooden cutouts
- DecoArt Americana Paint in Hauser Dark Green
- DecoArt Americana Paint in Primary Red
- DecoArt Americana Paint in Snow White
- Scrapbook paper
- DecoArt Decou-Page
- Paintbrush
- 1-inch foam brush
- 100-grit sand paper
- Tack cloth, optional
- Paper towels
- Wood glue
Instructions
Sand the wooden tote and use a tack cloth or wet paper towel to wipe away any dust.

Paint the interior of wooden tote with two coats of Primary Red. Let dry.

Paint handle and end sides of tote with two coats of Hauser Dark Green. Let dry.

Trim scrapbook paper to fit front of tote. (For this particular hot chocolate bar caddy, I used smaller squares of plaid scrapbook paper and pieced them together to match the pattern. You could also use a 12X12 sheet of scrapbook paper.)
Using the foam brush, apply thin coat of Decou-Page to back of scrapbook paper. Adhere to tote. Brush a thin coat of Decou-Page to front of paper and allow to dry. Repeat on other side of wooden tote. You may want to add a second coat of Decou-Page to seal the project.
Using a dry-brush technique, paint the wooden cutouts with Snow White. (I used a snowman and reindeer for my portable hot chocolate bar.) Once the paint has dried, use wood glue to attach the wooden cutouts to the caddy.

Using a jar lid, trace three circles on scrapbook paper. Use scissors to cut out circles and insert into jar lids. Fill mason jars with peppermint sticks, chocolate-covered pretzels, chocolate chips, butterscotch chips and other hot chocolate mix-ins. Tie coordinating ribbon around jar lids.
You’ll find all different sizes of wooden tool caddies at the craft store, so you have the option of adding a lot of extras to your portable hot chocolate bar.

This 3-jar version is easy to stash on the countertop or in the pantry. When Jackson and his friends need to warm up after playing outside, I can easily set up a hot chocolate bar on the porch.

It’s also light enough to carry it during a snowy walk in the woods; just replace one of the jars with a Thermos and take along some paper cups.
For more fun winter crafts, snacks and treats, you might enjoy these posts:

Peppermint Twist Hot Chocolate


Leave a Reply