


These aged copper Easter eggs are made using variegated metallic leaf sheets. The technique to create these decorated Easter eggs is so simple, but the results are stunning!
I’ve been on a real Easter egg decorating kick lately, making decoupaged eggs and adding vintage botanicals and florals to them.

These metallic leaf aged copper Easter eggs are my latest crafty creation. I think they’re pretty gorgeous, if I do say so myself.
The animal print inspired design on these eggs is very high-end glam! They’re pretty enough to display all year long, not just at Easter.

And they’re really quick and easy to make when you have the right supplies — all of which are available on Amazon.
I love adding metallic leaf and gilded details to craft and home decor projects. I always keep an assortment of metal leaf sheets on hand to add glitz and glam to things like seashells, oyster shells, faux pumpkins, Christmas ornaments, pinecones and now Easter eggs.
You can add metallic leaf to many different types of eggs, included papier mache eggs, craft eggs and plastic eggs, as well as real eggs that have been blown out and cleaned.
This post contains affiliate links for your shopping convenience. If you make a purchase based on my referral, I earn a small commission, at no additional cost to you. Read my full disclosure policy here.

To Make Aged Copper Easter Eggs, You Will Need:
- Eggs – For this particular project, I used papier mache and decorative eggs from the craft store. Faux craft eggs, blown-out real eggs or plastic eggs should also work.
- Variegated metallic leaf sheets – Metal leaf sheets come in a variety of finishes and colors. I used this blue and copper design for these eggs and I’ve included some other pretty options in the shoppable links below.
- Adhesive Size – A thin, water-based glue used to prepared a surface for metal leafing
- Foam Paintbrushes – Ideally, you’ll need two small foam paintbrushes, one to apply the adhesive size and one to brush away the excess leaf.
Shop for Metallic Leafing Supplies

How to Make Metal Leaf Easter Eggs
I’ll walk you step-by-step through the process I used to make these copper Easter eggs.

For more metal leafing tips, tricks and alternatives, make sure you check out this post and this one.
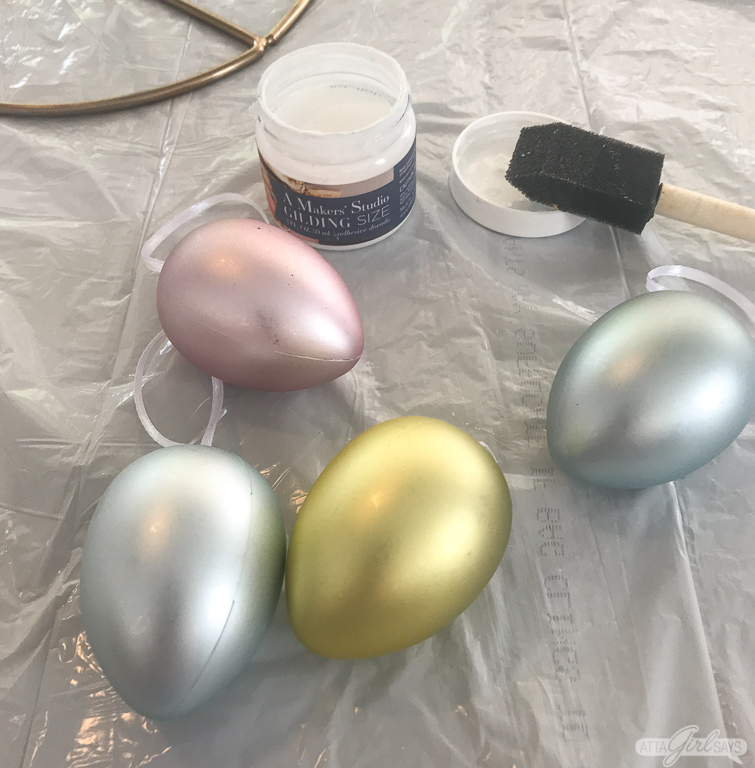
Apply a thin coat of adhesive size to eggs and allow to dry to tack. My eggs had ribbon hangers attached to them, so I was able to hang them to dry.
Drying time will vary depending on the particular brand of glue you use. Read the instructions to find out how long you need to wait for the size to dry before applying the metallic leaf.
It’s usually about 10 minutes, and you’ll be able to see the adhesive size change in color as it comes to tack. It will be dry and sticky to the touch.

Metallic leaf comes in books with tissue paper between each sheet. For this project, I found it worked best to place a sheet of tissue-backed leaf on my worktable. (Do not try to separate the leaf from the tissue paper. It will just break apart if you try to touch it.)

Next, I placeed the egg on top of the leaf, either near the edge or center of the sheet. Then I used the tissue paper to wrap the leaf around the egg, covering the entire surface.

Continue the process until the entire egg is covered with metal leaf.

Using a clean, dry foam brush or delicate bristle paintbrush, burnish the metallic leaf into the egg and brush away any excess.

(You can save the excess metal leaf pieces for other projects. Just gather them in a plastic bag or container.)
If you find that there are any bare spots on the eggs, you can repeat the leafing process. Add adhesive size to any bare spots, allow to dry to tack and apply metallic leaf.

If you like, you can coat the finished eggs with a sealer. But I haven’t found it necessary with my metal leafing projecets.

Display the finished eggs in a pretty bowl or hang them from an Easter tree.
More Easter Egg Crafts
You might enjoy these other Easter egg crafts:
Pin This! Copper Leaf Anmal Print Easter Eggs


[…] gold, silver, copper and other metal finishes, as well as variegated leaf like I used for these aged copper Easter eggs for different […]