
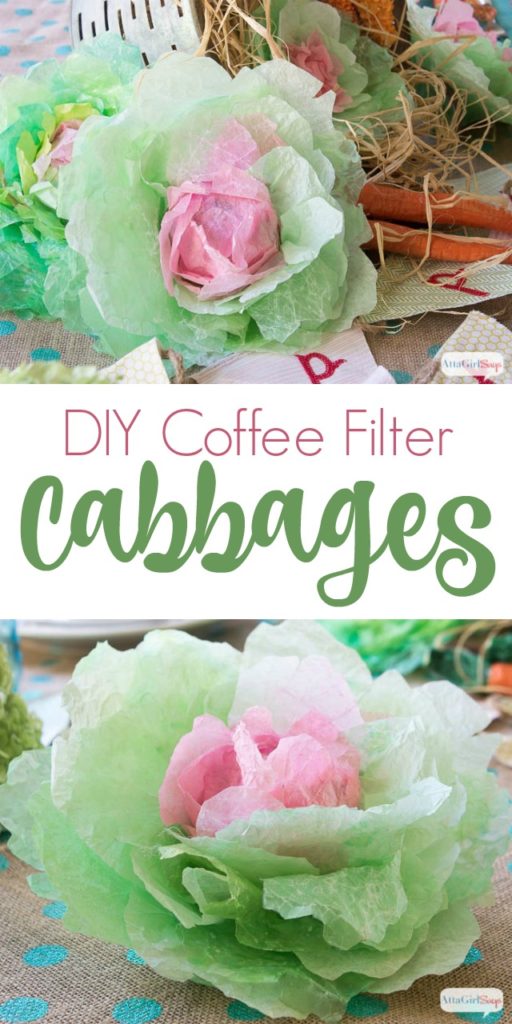
If you’re a fan of coffee filter crafts, you’ll love making these colorful spring cabbages for your spring and Easter decorating vignettes. Keep reading for step-by-step instructions and a video tutorial that will teach you how to make these realistic-looking cabbages.
Do you love coffee filter crafts? Well, this one is certainly unique.
My friend Suzy and I have been talking about sharing these realistic coffee filter cabbages with you for more than a year!

You read that right. A year!
We’ll we’ve finally gotten our stuff together and our schedules aligned.

Today we’re both sharing a video tutorial for how to make these cabbages and how we’re using them in our spring and Easter decorating.

We learned how to make them last year at a display workshop at our local Anthropologie store.

The store later used our coffee filter cabbages as part of their Earth Day window display.
[clickToTweet tweet=”You’ve never seen a coffee filter craft like this! Learn how turn plain white coffee filters into colorful & realistic spring cabbages. #coffeefiltercrafts #eastercrafts #springcrafts #papercrafts” quote=”You’ve never seen a coffee filter craft like this! Learn how turn plain white coffee filters into colorful & realistic spring cabbages. “]
The coffee filter cabbages are easy to make, but there are several steps involved. And it’s a bit of a process…
So Suzy, who blogs over at Worthing Court, and I made a video tutorial to walk you through the entire process, from dying the coffee filters to assembling the cabbages.
Coffee Filter Cabbages from Amy Buchanan on Vimeo.
I think we need our own TV show! How about you?
Admittedly, the video is kinda long. But if you’re planning on making these cabbages, you’ll find it useful to follow along.

You’ll start out by dying coffee filters green and pink. You can use food coloring, Easter egg dye or Rit dye. Suzy gives you the scoop on the best method for dying and drying the coffee filters.

Once the filters are dry, you’ll want to trace and cut out your cabbage leaves. You’ll need small, medium and large green leaves and small and medium pink leaves. Lots of each. That’s as specific as I can be because I didn’t bother counting. 🙂

You can download a printable pattern in PDF format here.

Then it’s time to start assembling your cabbage by hot gluing leaves to a ball of newspaper wrapped in masking tape. We started with pink leaves, then added green as we worked our way out.
If you want to see just that part of the tutorial, here it is:
The thing that makes these cabbages look so realistic is that you dip some of the coffee filter leaves in wax. (Be sure to get unscented candle wax; it works better than scented paraffin we used in the video.)

Here’s one of our classmates making her cabbage. You’ll see she used darker green coffee filters on the outside.

Some people used fewer waxed leaves, but I wanted a lot for my cabbage. It’s just personal preference.

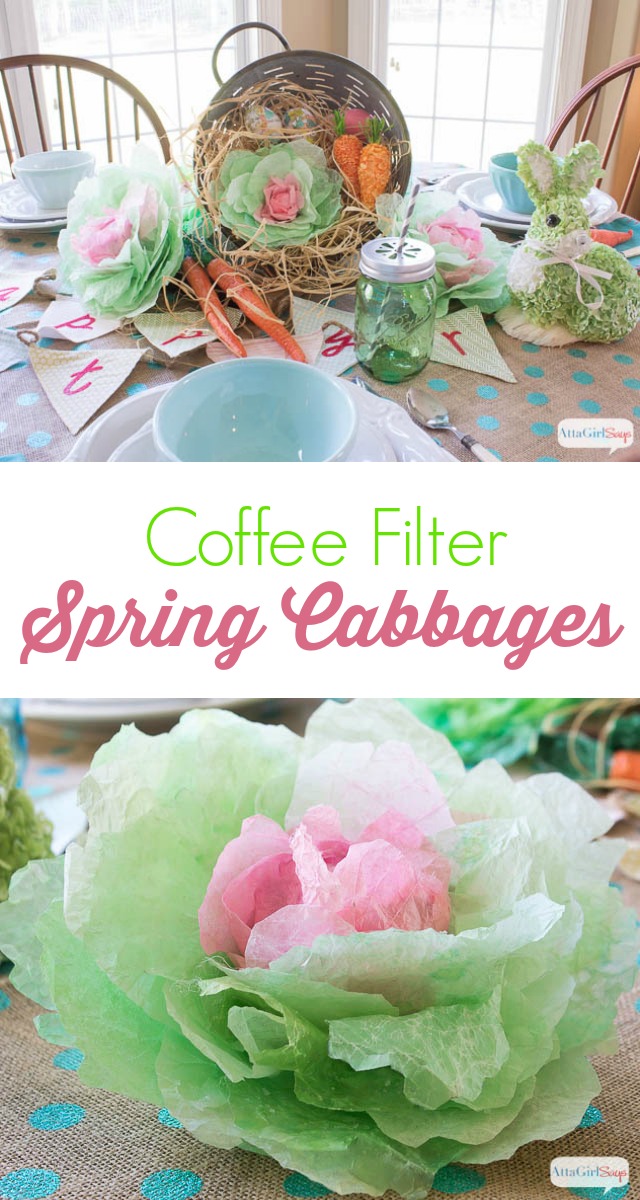
I’ve made enough of these to realize that no two cabbages are alike, and each is a work of art. Just like the real thing.
I’m using my coffee filter cabbages as the centerpiece for an Easter table setting.

I nestled my cabbages and some carrots in an olive bucket from Walmart.

This display was super easy to throw together using some burlap yardage, Easter decorations I already had, my decoupaged storybook Easter eggs, mix-and-match dishes, silverware and colorful mason jars.
[clickToTweet tweet=”Tuck handmade coffee filter spring cabbages into an Easter basket or olive bucket to create a pretty spring vignette. #coffeefiltercrafts #springdecorating #EasterCrafts” quote=”Tuck handmade coffee filter spring cabbages into an Easter basket or olive bucket to create a pretty spring vignette.”]

I am so pleased with how my cabbages turned out. So realistic.

Wait until you see the adorable way Suzy is displaying her coffee filter cabbages.

Don’t forget to pin so you can make your own.
Check out these other Spring crafts:
Vanessa
Hi! I know I am very late to this amazing post and creation, but I’m wondering if you could tell me if there is any issue with storing these super cute cabbage? More specific, does the wax break down/crumble off the head of cabbage after being stored? This might be a weird question, but I’d like to know if there is either a special way these need to to packed and stored and also make sure they will be reusable for many years to come. If there is any issue with the wax, can that step be skipped?
Thank you for any advice you can lend.
Sincerely, Just now caring up with the cuteness
Atta Girl Amy
Hi Vanessa:
I would not store the waxed cabbages in an attic or hot garage, but rather in a climate controlled space.
I made this craft years ago, and I ended up getting rid of them in a cleanout since I didn’t plan to use them again. I don’t think any of the wax had flaked away, though. But I honestly don’t remember. So sorry. 😞
I think you could skip the waxing step if you’re concerned about that. The look will be the same, but they leaves won’t have the same texture as the waxed ones. The wax really helps them look like real cabbage leaves.
As for storage, I would try to store them in a bin or box where they wouldn’t get crushed and wouldn’t get dusty. And again, in a climate controlled space so the hot glue doesn’t heat up.
Hope this helps.
— Amy
Doreen
Seriously, the best coffee filter craft I’ve ever seen! Can’t wait to make my own!! Thanks Amy and Suzy!
Cynthia
Wow ladies these are amazing!!!!! I can’t believe how fantastic these turned, you superstars!!!! Happy Easter!
Cynthia
Nancy Carroll
These are just precious!!! If you ever hold another class, I’m in !!!
Marty Walden
That is amazing! I’ll watch the video later when I can. I know y’all had fun!
kirby carespodi
Ladies! Normally I don’t “do” fake, but I LOVE these! I am going to make these soon and link y’all!
Suzy @ Worthing Court
I had so, so much fun making these and putting the video together with you! I adore the centerpiece that you used them in. Too cute!