
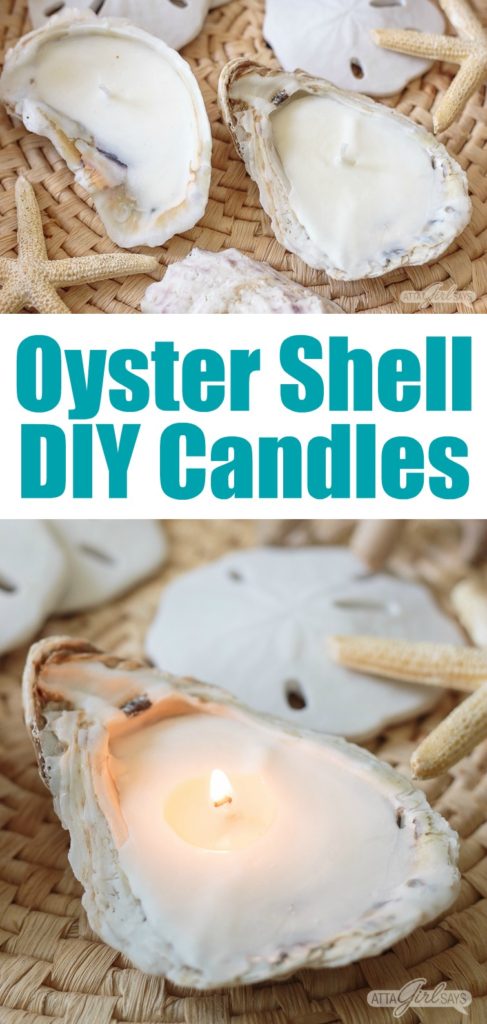
Hang onto summertime and those beach vacation memories by making these pretty, great-smelling DIY oyster sea shell candles. How pretty would these be on the tables at a beach wedding or a romantic seaside dinner.
With school back in session and Labor Day in the rearview mirror, most of us are already thinking ahead to fall. But I couldn’t let summer slip away without sharing one more beach-inspired craft. I had lots of shells left over after making the oyster shell jewelry storage dishes, so I whipped up some easy DIY sea shell candles.

They’re scented with a fragrance reminiscent of beach breezes.
I’m definitely a beach girl, and I love making seashell crafts, whether it’s gilding shells or using them to create inexpensive artwork for our sophisticated coastal bedroom.

I even added some silver plating to one of the oyster sea shell candles to glam things up a bit.
Supplies for Sea Shell Candles
- Oyster shells
- 6 ounces candle wax (You may need more or less, depending on how many shells you are using and their size)
- 0.3 ounces fragrance oil (between 1.5 and 2 teaspoons, depending on how strongly scented you want your sea shell candles to be)
- candle boiling bag and rubber band
- measuring cup or candle pouring pot
- saucepan
- wicks
- wooden skewers
- Rimmed baking pan lined with aluminum foil
This post contains affiliate links for your shopping convenience. If you make a purchase based on my referral, I earn a small commission, at no additional cost to you. Read my full disclosure policy here.
How to Make Oyster Sea Shell Candles
Making sea shell candles is a bit more challenging than making a candle in a jar or another vessel with a flat bottom. But this is still a really easy project. I promise! (You may find it helpful to read up on some basic candlemaking tips before beginning this project.)
Oyster shells are shallow and uneven, so you need to be mindful of the wax overflowing when you’re making them and when you’re burning them.
Try to choose oyster shells that sit fairly level and with a deep well in the middle for the wick and the wax.

Put a wick in the center of each oyster shell. I like to use adhesive wicks so they don’t move when I pour in the hot wax.. You’ll want to leave the wick long until the wax hardens. Wrap the excess wick around a skewer or thin dowel and prop it on the oyster shell.
Once they were prepped, I set the shells on a baking pan that I lined with aluminum foil. I also wadded up pieces of foil and positioned them around the shells to hold them as level as possible when I poured the wax.
Use a double boiler method to melt your candle wax. Measure the wax into a candle bag and secure with a rubber band. Add a few inches of water to the bottom of a pot and add the sealed candle boiling bag. Bring the water in the pot to a boil, then reduce the heat to simmer. Watch the wax closely. When it has liquified, carefully remove the boiling bag from the water and place it in a measuring cup or a candle pouring container.
Carefully open the bag and fold the edges down around the measuring cup or container to make pouring the hot wax easier.
Add the fragrance oil to the melted wax and stir with a wooden skewer or stick to fully incorporate the scent.
Slowly and carefully pour the hot wax into the oyster shells, being careful not to disrupt the wicks. Depending on how deep and level the shells are, some of the liquified wax may spill. That’s why you need to make these on a lined, rimmed baking sheet or shallow pan.

Allow the wax to cool and harden for several hours before moving the sea shell candles.
Once the wax has hardened, you may trim the wicks and clean up any dried wax on the outside of the oyster shells. An easy way to remove wax is to pop the candles in the freezer for a while. The wax on the outside of the shell will become brittle and easy to remove.
If you have extra wax left in your boiling bag and from cleanup, don’t throw it away. Just toss it back in the boiling bag to reuse at a later time. Just remember that it is already scented.

If the surfaces of your candles are not smooth or if the skewers resting on top left a mark, you can use a heat gun to smooth them out. Just a few seconds is all it takes.
It’s always a good reminder to never leave candles burning unattended. That safety lesson is especially important when you’re burning any oyster or sea shell candles. Because of the shallow and uneven nature of shells, it’s possible that wax may overflow the container when you burn these candles. Don’t place them directly on a tabletop.
I recommend adding some sand to a a metal tray and nestling the candles in that. That way, the sand will catch any melted wax, and you won’t have a mess to clean up afterwards.
Don’t forget to pin this oyster shell craft so you can make some of these wonderful smelling sea shell candles.

For more sea shell crafts, check out these posts:


[…] Oyster Shell Candles […]