

Learn how to make a snowy winter centerpiece using birch logs and pine cones. This easy-to-make decor is great for a winter wedding, a winter wonderland party or to decorate your tabletop all season long.
I’m not quite ready for real snow yet, but I’m all about the snow and ice when it comes to decorating. I’m adding a wintry look on my kitchen table with this centerpiece using icy and snowy birch logs.

This is a perfect easy craft project to make in front of the fire on a chilly day.
This is a sponsored post in partnership with Walnut Hollow, and it contains affiliate links for your shopping convenience. Read my full disclosure policy here.

My blogging friends and I have partnered with Walnut Hollow to share five simple wood crafts. You’l definitely want to check them all out, and be sure to read on to the end of the post to enter the giveaway to win some great Walnut Hollow products.
Supplies
To make your own snowy winter centerpiece, you’ll need the following supplies:
Assorted birch pillars (3-inch and 7-inch)
pinecones
DecoArt Snow-Tex
DecoArt Mixed Media Liquid Glass
fine white or iridescent glitter
paintbrush
plastic knife or plastic palette knife

Walnut Hollow’s birch logs are pretty just as they are, but for this winter centerpiece, I wanted to add some faux snow.
DecoArt Snow-Tex is perfect for creating a textured, realistic snowy effect, especially when you add a light dusting of glitter.

To create the snowy look, begin by spreading Snow-Tex on the birch log, using a plastic knife or a palette knife.
You can also use a paint brush to apply the Snow-Tex on those areas where you just want a light dusting of snow.
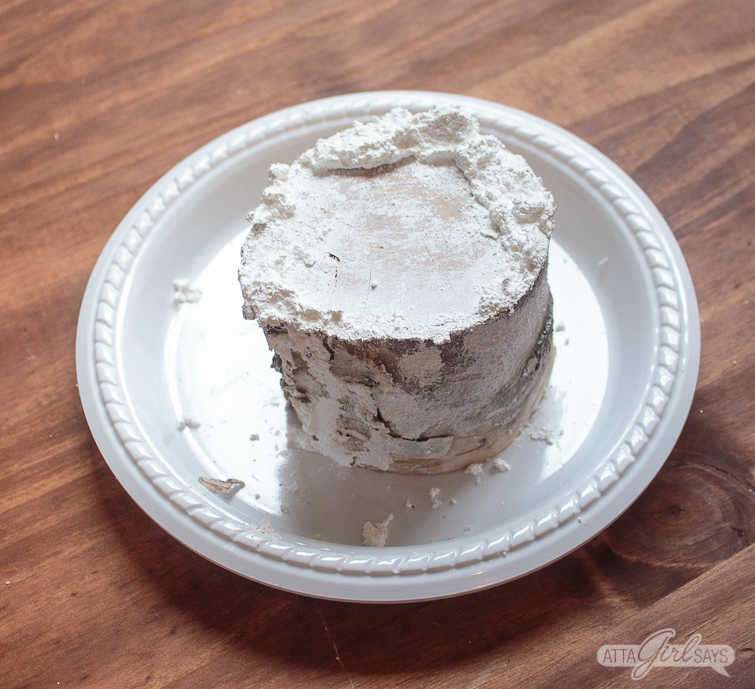
The Snow-Tex has a consistency that is similar to frosting or spackle. I suggest spreading in on as if you were icing a cake, but don’t worry about smoothing it out.
You want it to have some texture and to be uneven, so that it looks like real snow mounded on the logs. You can apply it as thickly or as thinly as you like, adding Snow-Tex to the tops and sides of the birch pillars. I also recommend mounding some around the base.

While the Snow-Tex is still wet, sprinkle a light dusting of fine glitter on the birch log.

You can also add ice and icicles to the birch logs using Mixed Media Liquid Glass. I just drizzled it randomly onto the snowy surface (while the Snow-Tex was still wet) and dusted with glitter.
The Liquid Glass dries hard and clear, so it really does look like ice.
The Liquid Glass and Snow-Tex will dry and harden in about 2 to 3 hours, but you may have to wait longer if you use a thick coating.

I also some “snow” to some pinecones, using the same technique.
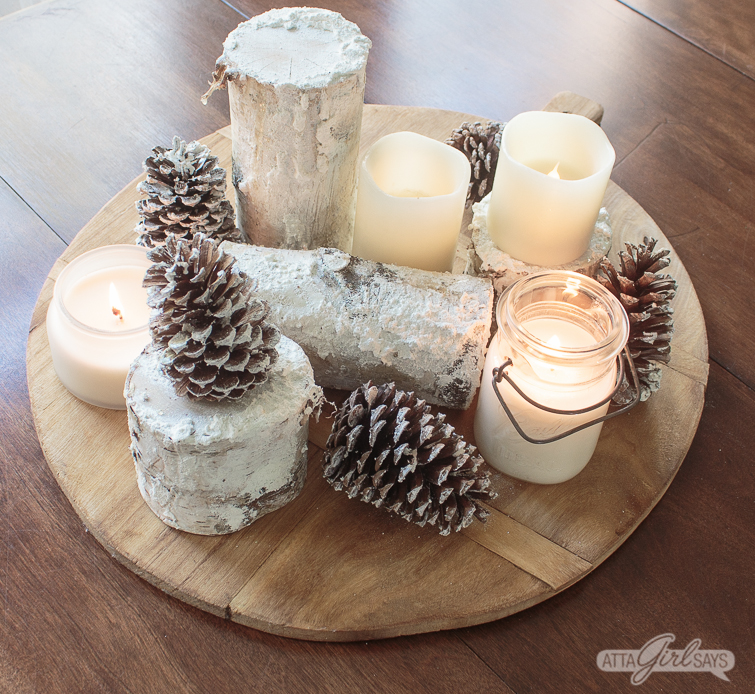
Once everything was dried, I arranged the birch logs, pinecones and assorted white candles, including my favorite vintage jar candles, atop an old cutting board.
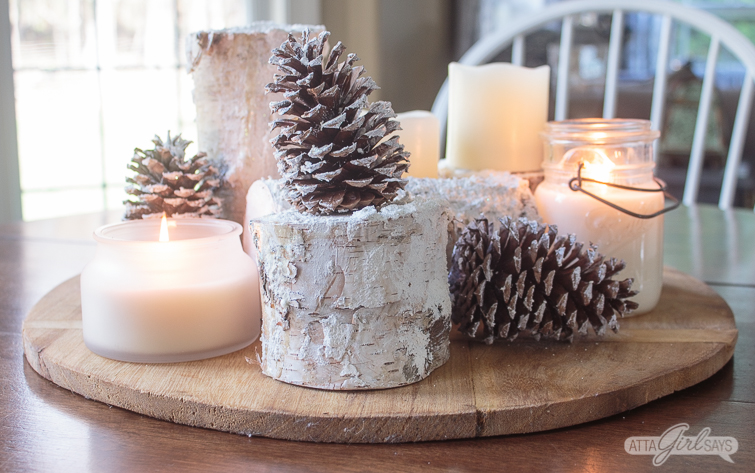
The arrangement would also look pretty on top of one of Walnut Hollow’s wood slices.

I love the simplicity of this craft and the fact that it can easily transition from fall, through Christmas into winter. And there are many different ways I can use the snowy birch logs. Watch for them throughout my house this winter!
I hope this project has inspired you to get creative with wood.
Head on over to Walnut Hollow for dozens of surfaces that are ready for your creative ideas… Plus, we’re hosting a GIVEAWAY!!
Visit these other project ideas with surfaces from Walnut Hollow to enter to win!
- Major Hoff Takes a Wife fashioned some clever coffee storage.
- Seeking Lavender Lane assembled a tiered tray from clock faces.
- Hunt and Host made a cozy winter sign using her hot tool.
- Robb Restyle shared an easy chalkboard sign project.

Tammie
Lovely centerpiece!
Sara
I really love how gorgeous and elegant it looks! You’re right, they are fab on their own, but the snowy sparkle just made it perfect for the winter! That’s a centerpiece to get you through to March for sure!
latanya
That is a beautiful display for the holidays.