

No green thumb required for these adorable and great-smelling melt-and-pour succulent soap bars. “Plant” them in a homemade coffee salt scrub and add realistic-looking soap crystals to complete the look.
These homemade succulent soap bars, which take only minutes to make, are sure to be a hit with plant lovers.

You can make them in any shade of green you like and add a favorite fragrance to make bath time even more lush.

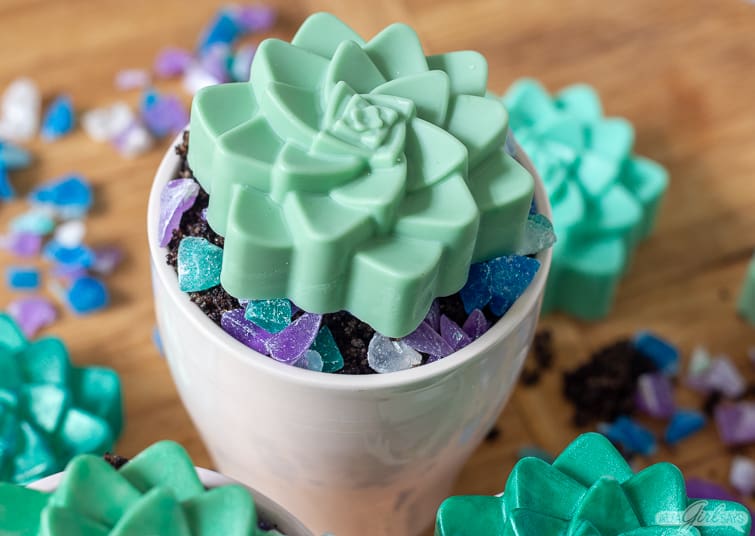
While the bars are pretty all on their own, I had to add a little more pizazz to the presentation by planting the soaps in ceramic pots of filled with coffee salt scrub and DIY soap gemstones and crystals.

How’s that for a little plant magic?
These are a jazzed up version of the cactus soap terrariums I made a while back.

The bathroom is turning into a regular greenhouse with all these beauties around the tub!
supplies for DIY soap Bars

- 6 ounces clear melt-and-pour soap base
- 6 ounces white melt-and-pour soap base
- coconut oil
- succulent soap mold
- assorted green soap colorant blocks
- fragrance oil (Clover & Aloe, Lush Succulent or Cactus Flower fragrance oils are good choices. If you prefer essential oils, lavender or tea tree are good options.)
- spray bottle filled with rubbing alcohol
- assorted green mica colorants (optional)
- medium-sized microwave safe glass measuring cups or bowl
- graduated pipettes
- spoon or spatula
How to Make Succulent Soap
This is a really simple melt-and-pour soap recipe that is perfect for beginners. Kids can help in the prep, too.
It only takes about 10 minutes to make four 3-ounce succulent soap bars. They’ll set and harden in a few hours. Then they can be removed from the molds and used immediately.

Start out by cutting the clear and white soap base into cubes. Place in separate glass measuring cups or bowls.
Heat the clear soap in the microwave, in 30-second increments, until fully melted. Stir after each 30 seconds in the microwave to help with melting.
Add 1 teaspoon of coconut oil to the liquefied soap, and stir until it is melted.

To color the soap, add a small piece of green color block to the melted base. I usually start with a 1/4-inch cube of color block, then add more if I want a darker, more saturated color. Stir until the color block is melted and fully incorporated.
If the soap begins to harden or thicken, you can return it to the microwave for a few seconds to remelt it.
For this particular project, I used Hydrated Chrome Green Color Block and the Green Chrome Color Block from Bramble Berry. I also used some assorted green mica to add some shimmer to the soap. You can mix a variety of different micas and color blocks to create custom colors.
To color soap with mica, dissolve 1 teaspoon of powdered mica into 1 Tablespoon of rubbing alcohol. Once fully dissolved, add as much colorant as you like to the soap.
Next add the fragrance oil to the melted soap. For a lighter scent, use a graduated pipette to add 2 ML of fragrance to 6 ounces of melted soap base. For a stronger scent, add up to 4.5 ML of fragrance to 6 ounces of melted soap base. Stir well to fully incorporate.

Spritz the mold lightly with rubbing alcohol to make the finished soap easier to release. Pour the melted soap into the mold. Spritz the surface lightly with rubbing alcohol to pop any air bubbles.
Repeat the process with the white soap base to fill the other two cavities in the mold.
Allow the soap to cool, harden and set for four hours, or overnight, before removing from the molds.

Wrap the soap tightly in plastic wrap until you’re ready to use them. Clear soaps, in particular, may develop a glycerin dew when exposed to air. While not particularly attractive, this dew is not harmful and can be wiped away. But wrapping soap in plastic helps prevent it.
If you’re planning to give these soaps as gift or favors, you may want to “pot” them and add some soap gemstones to the “soil” so they look more like real plants.

I used this exfoliating homemade coffee body scrub, made with sea salt and essential oils, as the dirt for my succulents.

Then I made soap crystals, using this technique, and cut them into small pieces to put in the pots around the succulent soaps. I’ll be sharing a more detailed tutorial on these soap gemstones and agate slices soon.
For the succulent planters, I cut the gemstone soaps into small chunks and slivers for the small pots.

More Easy Soapmaking Projects
If you enjoyed making these succulent soap bars, you may like these other melt-and-pour soap tutorials.


Pin This! DIY Succulent Soap with Crystal Gemstone Soaps


Iris
They look great as a souvenir for my mother’s birthday!