
I love the Dollar Spot at Target. As soon as I walk in the door, it calls my name, and I’m filling my cart with all manner of cuteness.

Like these little straw tote bags, which are just $3 apiece.
Though they’re lovely as is, these totes make a great canvas for a creative type like me. (Remember my painted argyle tote bag? A girl can never have too many purses!)
For this month’s no-sew showcase with one of my favorite bloggers, I’m going to show you how to make a tote bag that just screams spring!


For this project, I started out with a plain tote, some pretty print fabric and some fusible hem tape and double-stick fabric fusion tape.

You’ll also need some kraft paper or newspaper to make a pattern.
This part is key if you want your fabric band on your bag to lay flat.
Wrap a band of kraft paper around the top of your tote bag and trace the curve of the bag.

Position the paper pattern on your fabric, centering the print on the pattern.

Cut out the fabric, allowing about 1 inch for seams on each side.
Be sure to iron the fabric after you cut it.

Next, run a strip of double-stick fabric tape along the top edge of the bag, all the way around.

Attach the fabric to the tape, tucking under the raw edge.
Before you start attaching your fabric, decide where you want your seam to be. I decided to put mine on the side of the bag.
However, leave the side seam open until you “hem” the bottom of the band of fabric.
Once the top of the fabric band is attached to the bag, add another piece of double-stick tape along the bottom, underneath the fabric, about 1/2 inch up. Fold under the raw edge and secure.
Finally, finish the side seam with double-stick fabric tape, folding under any raw edges.

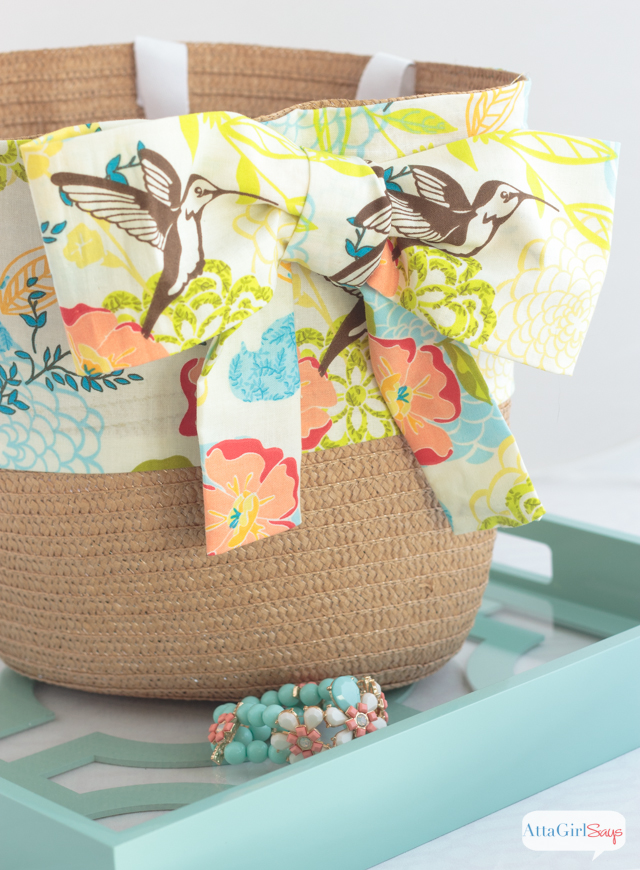
This bag would be pretty with just a band of fabric at the top, but of course, I had to add more embellishment in the form of a big floppy bow.
Back in the 80s, I used to wear bows like that in my hair!
Forgive the fabric switch here for the next part of this tutorial. I made several bows from different printed fabric, but I only photographed the making of one.

1) Cut a strip of fabric that is about twice the length and width that you want your final bow to be. Before cutting, add another inch to the length and width to allow for seams.
2) Fold over the fabric on each side about 1/2 inch and press to create a crisp edge. I actually don’t recommend using fusible hem tape or double-stick fabric tape to secure these folds. I did that for one bow and found it affected the flexibility of the bow.

3) Fold the fabric in thirds, lengthwise, overlapping to create a long tube. (Fold it like you might a letter you’re getting ready to mail.) Iron to create crisp fold lines.

4) Next, fold the edges of the tube toward the center, overlapping by at least a half-inch, to create a band. Use fusible hem tape or double-stick fabric tape to secure the two ends together.
This makes the body of your bow.

5) Repeat steps 1 through three from above to create a longer, thinner length of fabric that will form the tails of your bow.
6) Be sure to tuck under the raw edges and fuse the short ends together for a finished look.

7) Tie the long, thin piece of fabric around the middle of the bow, pulling taut to cinch the middle. Be sure that the seam is on the same side as the knot.

8) Attach the bow to your tote bag, knot and seam side down. You could use hot glue for a permanent fix, but I prefer using a safety pin so I can change up the look of my tote bag and mix and match different solid and print bows.

Pretty styling, if I do say so myself.
For another idea of how to turn a $3 straw tote into a stylish accessory, check out my A is for Argyle Tote Bag transformation.


If you’re a fashionista, you may also like this no-sew wristlet clutch I made last year.
I told you, I have a handbag obsession!
Be sure to visit Confessions of a Plate Addict to see Debbie’s no-sew project.

Valerie@Occasionally Crafty
Ah! This is so cute! And no-sew? I’m all over that. Featuring you today on the Handmade Hangout! Thanks for linking up!
Atta Girl Amy
Thanks so much for the feature! I’ve tried my hand at sewing, usually to disastrous results, so no-sew is definitely my game!
Jamie @ Love Bakes Good Cakes
That is an awesome transformation!!! Thank you for joining us at Freedom Fridays! You are being featured at this week’s party and we would love for you to join us again! The party starts tonight at 8:30 pm EST and runs until Tuesday evening! Hope to see you there! 🙂
Atta Girl Amy
Thank you so much for the feature! I’ll definitely be linking up again.
Cydnee/Tampa Cake Girl
I love this! I do not sew but I think I could make this. Adorable! Thank you very much for joining in the celebration of #purebloglove, we enjoy having you each week. I hope to see you on Thursday at 8PM, EST through Sunday night. ~Cydnee
Atta Girl Amy
I’m strictly no-sew, as well. It’s one crafting skill I can’t seem to master. I love that there are so many shortcuts and supplies that make it possible to no-sew things projects like this tote bag.
Tiffany
Hi, Amy ~ I’m visiting from the Creative Collection Link Party. I love this bag, and I’m kind of a nut for birds, so the fabric you chose really called to me! I almost grabbed one of these bags from Target the other day. I was thinking I’d paint it, but I love the idea of adding fun fabric and a great bow even more. Thanks for the inspiration! I’m off to Target to see if I can snag a couple of those bags. :0)
Atta Girl Amy
These bags have so much potential! I love the one I painted and this one. Would love to see what you do with yours.
Andrea@TablerPartyOfTwo
Love this! So cute. 🙂 Featuring tonight on Sunday Features at Tabler Party of Two!
Atta Girl Amy
Thanks so much for the feature!
Debi @ Surroundings by Debi
I love this aisle at Target as well. So many creative things you can find for just $$$. You created such a cute tote! I am gong to h ave to get one of these to make my own! Thanks so much for sharing at the Thursday Favorite Things Blog Hop!
kirby
Very cute!! Love the fabric you chose!